Hello, my friend. If you don’t know me, my name is Erick Wendel, a passionate software developer and Node.js core developer who’s making very specific questions on the internet and not finding answers.
That’s the reason behind my recent videos on my YouTube channel. I’ve already done other interesting subjects such as creating Web APIs from scratch and with no frameworks using Node.js, Recreating Node.js from scratch, and even a video about recreating the Web Socket Protocol using raw JavaScript, on which this blog post was based.
You have probably already heard about the WebSocket protocol. It has become the de-facto standard for real-time communication on the web. I was researching material about it and found it’s pretty hard to see this kind of stuff online, especially if we’re talking about something that's done with no third-party libraries or frameworks which is compatible with the browser and the ws:// protocol.
Summary
TL;DR
If you want to skip the tutorial and go straight to the code, you can find it here, and you can also check out the same content in my video here.
A bit of context
The best I could find was an MDN article explaining how to implement it, but with no actual code samples. I also found many people on Stack Overflow saying you shouldn’t implement a WebSocket server from scratch because it’s simply too hard. “this ought to be a nice challenge”, I thought, and off we go to start implementing this.
Since I couldn’t find anything for Node.js, I figured I should look for examples in other programming languages. I found a great blog post in which the author used only the ruby standard lib to build a WebSocket application handling bits and bytes just like I wanted to do. The thing is: I don’t know much about Ruby, and porting their code to Node.js was getting a bit messy. On top of all that, I couldn’t make it work because Ruby has different tools to handle numbers and binaries than what I could find for Node.js.
So I decided to look at how Node.js WebSocket libraries did this and went first to the Socket.io repository. I found it quite hard to understand, but when I got to the ws package source code, I found sender.js and receiver.js, two files that simplified things. I then decided to get some inspiration from their code but write my version of handling the low-level stuff since theirs was still a bit confusing, and that’s what we’re going to do in this article!
Before we begin, you may be asking yourself, why do this? Aren’t there libraries that already do this work for us? And the answer is yes: some libraries do all the hard work, but doing things by hand will allow you to understand deeper and more advanced concepts that go beyond your current knowledge. Also, if a library breaks for some reason, it’ll be easier for you to either fix it or solve the problem some other way.
About the WebSocket protocol
TCP
To start, imagine you need to list products on your e-commerce app. The front-end application that’s running on your phone requests data from the store's web service. The communication between your phone and the web service is established on top of the TCP protocol, the primary communication protocol for the internet.
TCP stands for Transmission Control Protocol, providing reliable, ordered, and error-checked transmission of a stream of bytes between two parts over a network. It is connection-oriented, which means a connection between a client and a server is established before sending data, and a host needs to be available to receive new connections from clients even before that connection gets established. Most of the internet things we do, such as sending and receiving emails, streaming videos, and visiting websites, work on top of the TCP protocol transfer layer.
HTTP
Going back to the example of displaying products on a mobile app, this usually occurs via an HTTP request. HTTP is an application layer protocol that runs on top of the TCP/IP suite and follows the Request-Response model: when you type a URL in your browser, it sends an HTTP message to the server, which responds with HTML, CSS, JavaScript, and any other files needed for that page to load.
But if HTTP is just a request-response model, what if we need real-time data to be fetched from the server? In that case, you can create an infinite loop that keeps sending requests to the server and checking if new data is available. That is a technique called HTTP polling, and the problem with it is that it’s resource-expensive and can cause server overloads from processing many requests.
A better way to deal with data that is constantly changing is to upgrade the connection and keep it alive. This is where the main protocol for real-time communication, and the star of today, comes in: the WebSocket protocol.
WebSocket
The WebSocket protocol came to fix the long-running problem with the request-response model. Now, the client and the server can exchange messages over a single TCP connection and stay connected as long as needed without overloading the server with lots of new connections and requests, which eases real-time data exchange between client and server.
Both WebSocket and HTTP depend on the TCP protocol and, to achieve HTTP compatibility, WebSocket makes use of what we call the HTTP Upgrade Headers to change the protocol from HTTP to WebSocket.
With all this in mind, here begins our journey to implement the WebSocket protocol from scratch. To do that, we'll be using the native Node.js http module, and going through this upgrade process, so everything should make even more sense soon.
Enough theory; Let us begin!
Node.js version
For this project, I will use Node.js 18.4.0. It's better if you use the same version to avoid weird errors and behavior discrepancies.
Starting the project
Inside the project folder, create two files: index.html and server.mjs. Using .mjs here will allow us to use ES Modules features, like import and export, top-level await and more.
With those files created, install the nodemon package with npm i -D nodemon, which will restart our server every time we make changes. You can fire it off now by running npx nodemon server.mjs. It should tell you it made a clean exit since our file is empty.

Now, go to the server.mjs file, where we will start creating the raw HTTP server, using the native Node.js http module. To do that, import createServer from the http package, and call that function passing a callback, which will be called for every request the server receives.
After creating the server, call the listen function to it and make it listen for connections on a specific network port. I'll use the 1337 port, but you can choose another one if you prefer.
import { createServer } from 'http'
const PORT = 1337
createServer((request, response) => {
response.writeHead(200)
response.end('hey there')
})
.listen(PORT, () => console.log('Server listening on port', PORT))
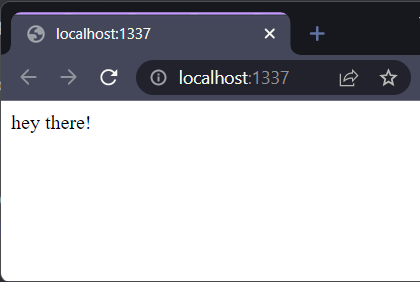
Now, if you open your browser and go to localhost:1337, you should see "hey there" printed out, which means everything is running correctly.
To prevent us from having any problems, let us implement some generic error handling to log errors to the console. Add the following to the end of the server.mjs file:
;[
"uncaughtException",
"unhandledRejection"
].forEach(event =>
process.on(event, (err) => {
console.error(`something bad happened: ${event}, msg: ${err.stack || err}`)
})
)
If everything goes well, nodemon should restart the server when you save the file.
Now go back to the HTML file and add the basic structure for our client. Follow the numbers in the comments for a quick explanation of what each line does inside the body tag:
<!DOCTYPE html>
<html lang="en">
<head>
<meta charset="UTF-8">
<meta http-equiv="X-UA-Compatible" content="IE=edge">
<meta name="viewport" content="width=device-width, initial-scale=1.0">
<title>Web Socket Client | Erick Wendel</title>
</head>
<body>
<p>Messages</p>
<output id="messages"></output>
<script>
const messages = document.getElementById('messages')
const socket = new WebSocket('ws://localhost:1337')
socket.onopen = (event) => console.log('WebSocket is connected!')
socket.onmessage = (msg) => {
const message = msg.data
console.log('I got a message!', message)
messages.innerHTML += `<br /> ${message}`
}
socket.onerror = (error) => console.log('WebSocket error', error)
socket.onclose = (event) => console.log('Disconnected from the WebSocket server')
</script>
</body>
</html>
Simple output component that we're going to use later
WebSocket is a browser API and is available in most modern browsers. Here we are opening a connection to our WebSocket server. Pay attention to the ws:// protocol: it means we're opening a simple, unsecured connection without TLS support or other security features.
This is the callback that will be called once the connection is established.
This will be called every time the client gets a message. The first parameter is the message itself, which we log to the console.
This callback will be called whenever the connection produces an error. We will log the error to the console.
And finally, this defines what happens when the connection to the WebSocket server is closed.
From this point on, you can notice how nicely the browser handles all the complexity. When we start to implement this on the back end, you'll see how much work has to be done to get this functioning properly.
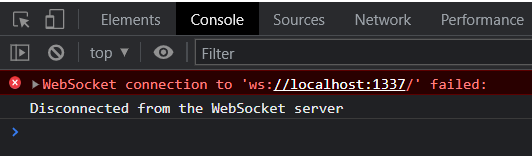
To see if everything is working, we can just open the HTML file in the browser. It should render a blank screen but, if you go to the developer console, there should be a network error, because the server can't handle WebSocket connections yet.
Implementing the server
When the browser tries to connect, our server should receive an upgrade event. To see that happening, go back to the server.mjs file and make some changes.
Store the result from the createServer function on a variable and, on that variable, register an event listener with the .on function, like this:
const server = createServer((request, response) => {
response.writeHead(200)
response.end('hey there')
})
.listen(PORT, () => console.log('Server listening on port', PORT))
server.on('upgrade', (req, socket, head) => {
console.log({
req,
socket,
head
})
})
Now, go back to the browser, reload the page, and watch the server console. You'll see that, now, there's some information being output, which should look something like this:
{
  req: IncomingMessage { ... },
  socket: <ref *1> Socket { ... },
  head: <Buffer >
}
That means we're correctly receiving data from the browser in the upgrade event, and we'll have to deal with that data on the server.
Establishing the handshake
The first thing we need to implement in our server is a handshake between the server and the client. For that, it's important to notice that the client will send us a key, which will be used to accept a specific connection and identify a specific client, acting as an id. Each client will have a unique id and that's how you can send individual messages to specific clients. The id is sent from the client inside the Sec-WebSocket-Key, and looks something like this: dGhlIHNhbXBsZSBub25jZQ==. Here's an example request from MDN:
GET /chat HTTP/1.1
Host: example.com:8000
Upgrade: websocket
Connection: Upgrade
Sec-WebSocket-Key: dGhlIHNhbXBsZSBub25jZQ==
Sec-WebSocket-Version: 13
To finish the handshake, the server must respond with a specific header containing a "magic string" defined by the protocol, concatenated with the client's key, all hashed with the SHA-1 algorithm, and encoded as base64. This might sound scary at first, but you'll see that, in code, this process is quite simple.
Going back to the server file, change the console.log inside the upgrade event handler so it logs the req.headers variable, which contains the request headers for the upgrade request:
server.on('upgrade', (req, socket, head) => {
console.log({
head: req.headers
})
})
You should now see the headers sent by the browser, something like this:
{
  head: {
    host: 'localhost:1337',
    connection: 'Upgrade',
    pragma: 'no-cache',
    'cache-control': 'no-cache',
    'user-agent': 'Mozilla/5.0 (Windows NT 10.0; Win64; x64) AppleWebKit/537.36 (KHTML, like Gecko) Chrome/107.0.0.0 Safari/537.36',
    upgrade: 'websocket',
    origin: 'http://localhost:5173',
    'sec-websocket-version': '13',
    'accept-encoding': 'gzip, deflate, br',
    'accept-language': 'en-US,en;q=0.9',
    'sec-websocket-key': '/24yrQwYCLqTDW9UjjOoiA==',
    'sec-websocket-extensions': 'permessage-deflate; client_max_window_bits'
  }
}
Notice the sec-websocket-key header, that is what we need for now. Head to the server.mjs file, and change the code to extract the header from the request and store it in a variable:
server.on('upgrade', (req, socket, head) => {
const { 'sec-websocket-key': webClientSocketKey } = req.headers
console.log({ webClientSocketKey })
})
Refresh the page, and you should see the key logged to your console.
Next, we need the magic string, which we can get, again, from the MDN Article. For convenience, I'll leave it here: 258EAFA5-E914-47DA-95CA-C5AB0DC85B11.
Now let's get real and write the function that finishes the handshake. The first thing we need to do is concatenate the magic string with the client id. We then use the native Node.js module crypto to create the SHA-1 hash and digest the content of the hash as Base64:
import crypto from 'crypto'
const WEBSOCKET_MAGIC_STRING_KEY = '258EAFA5-E914-47DA-95CA-C5AB0DC85B11'
function createSocketAccept (id) {
const hash = crypto.createHash('sha1')
hash.update(id + WEBSOCKET_MAGIC_STRING_KEY)
return hash.digest('base64')
}
Next, we need to add the returned string to a special response, required for the connection to succeed:
function prepareHandshakeResponse (id) {
const acceptKey = createSocketAccept(id)
return [
'HTTP/1.1 101 Switching Protocols',
'Upgrade: websocket',
'Connection: Upgrade',
`sec-webSocket-accept: ${acceptKey}`,
''
].map(line => line.concat('\r\n')).join('')
}
We can finally send the response back to the client with socket.write, and pass onSocketUpgrade as the event handler for the upgrade event from our socket, just like so:
function onSocketUpgrade (req, socket, head) {
const { 'sec-websocket-key': webClientSocketKey } = req.headers
const response = prepareHandshakeResponse(webClientSocketKey)
socket.write(response)
}
server.on('upgrade', onSocketUpgrade)
Now, if you go back to the browser and hit refresh, the connection should happen successfully!
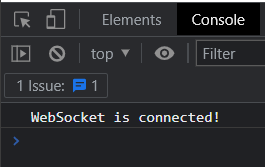
Nicely done! You just made a WebSocket connection following the WebSocket specification and using the crypto module to complete a handshake! Now, we need to build a function that will receive the client's messages.
Reading the first byte from a message
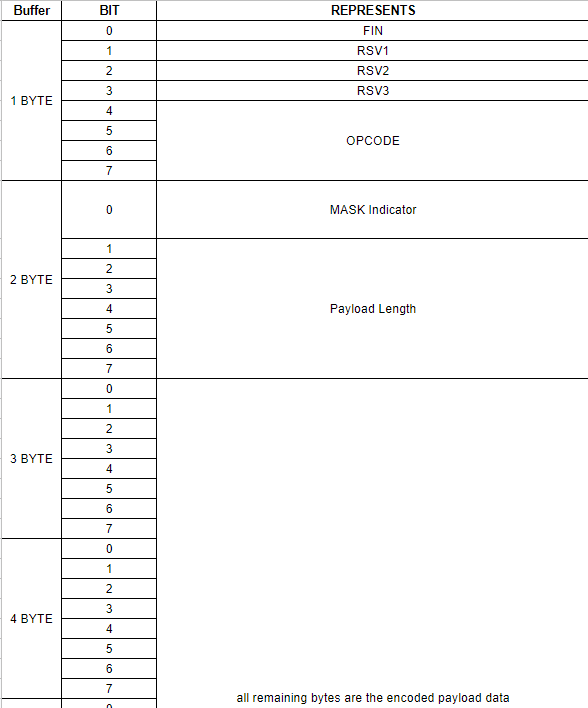
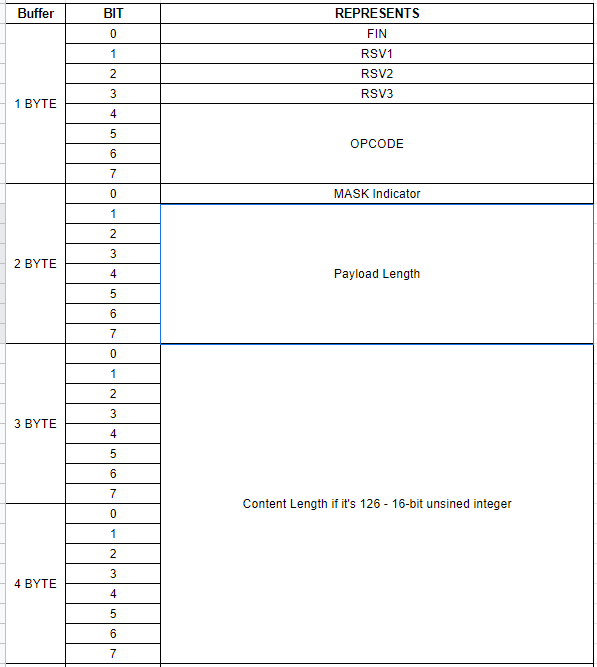
This is the part most people find difficult and confusing and, honestly, I cannot blame them. If you take a look at this section of the MDN article, there is a table representing where the data should go on each package. It's this one:
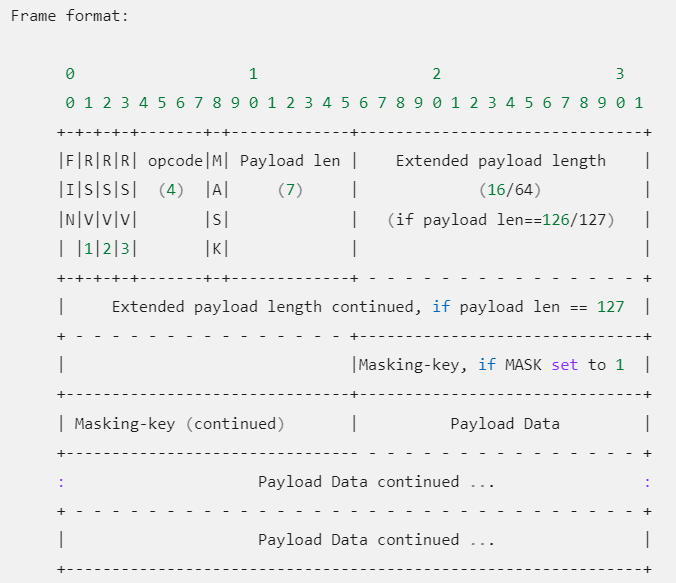
I found it too complicated to understand because the bytes are represented horizontally, but there are some line breaks, and some characters don't align. To help with that, I've made a spreadsheet that will make it all much easier to understand. Here's what it looks like:

First, let's check how the data is formatted and transmitted between both ends of the connection.
When the client sends data, we receive it as a data frame, which is an array of bytes containing information about the message and its payload. Each byte represents data about the message and where we should look next to understand its contents. The supporting spreadsheet shows each byte as a sequence of lines, each line representing a bit contained in a byte, followed by the relevant descriptions, on the columns to the right.
I won't try to explain the whole spreadsheet at once, so let's start to implement our data receiver, without worrying about decoding the messages (yet).
In Node.js, sockets are essentially streams (if you don't know what streams are, check out this video to get a good brief about them). The socket emits events and, with those events, we can get requests, see when a client is ready, or even get the bytes we need for the next step.
Let's add a listener for the readable event, which will be called when the socket is ready to output data for us to read:
function onSocketUpgrade (req, socket, head) {
const { 'sec-websocket-key': webClientSocketKey } = req.headers
const response = prepareHandshakeResponse(webClientSocketKey)
socket.write(response)
socket.on('readable', () => onSocketReadable(socket))
}
function onSocketReadable (socket) {
}
Now, if you take a look at the supporting spreadsheet, you'll notice that there are a few tabs. Each tab represents a message format. Some of the formats are "masked", meaning they follow some encryption rules, and some are not. Now, on the "complete" tab, take a look at the first byte: it tells us if a message fragment is the last one, and also tells us how to interpret the payload data.

We don't need this information right now so, inside our onSocketReadable function, we can just ignore it like so:
function onSocketReadable (socket) {
socket.read(1)
}
Reading the second byte
After being done with the first byte, it's time to move on to the second. The first bit tells us whether the message is masked or not. By default Web browsers always send masked data. Then looking at the table the first bit will be 1 when receiving messages.

The next seven bits will tell us about the payload length. To know this we must convert the next 7 bits into an unsigned integer, which we'll call the "size integer". But there's a quirk: if this value is less or equal than 125, the protocol tells us the message is short enough to be sent in that same byte, so all the remaining 7 bits are the payload length. But what happens if that isn't the case?
If you look at the numbers, 7 bits can encode a payload that has a length of up to 127 (this is 2^7 - 1 since we count 0). So, why 125 is the limit? Because then we can have two other rules in case the payload is longer:
If the size integer is exactly 126, then the message payload is too long to be encoded in just 7 bits. So, the protocol tells us that the next 2 bytes (16 bits) are the actual payload length, which will need to be converted into a 16-bit unsigned integer (since we're not dealing with 8 bits anymore).
Else, if the size is exactly 127, then the message is even larger, and we'll allocate the next 8 bytes (64 bits) as the payload length which will need to be converted into a 64-bit unsigned integer.
To make it clearer, let's take a look at our spreadsheet:

As you can see in the table, let's imagine a quick example where we receive a message that has a payload of Hello World, if we count the number of letters – including space – of 11 bytes (as every letter is a byte). We would receive a payload length of 11, which is less than 125, so the byte array would be allocated as:
[
  1, // mask bit
  // payload starts here
  0, // bit 1
  0, // bit 2
  0, // bit 3
  1, // bit 4
  0, // bit 5
  1, // bit 6
  1  // bit 7
  // total value of these bits tell us if payload is here or on the next byte
]
If we put it in line we have [1, 0, 0, 0, 1, 0, 1, 1], then removing the mask bit we're left with 0001011, which, converting to an 8-bit unsigned integer, will result in 11 as the example below shows us:
const byteArray = [1, 0, 0, 0, 1, 0, 1, 1]
const [maskBit, ...payload] = byteArray
console.log(maskBit.toString(2))
const payloadLengthAsByte = payload.join('').padStart(8, '0').toString(2)
console.log(Number(payloadLengthAsByte))
Now, let's write some code to deal with these rules. Start by creating three new constants at the top of server.mjs:
const SEVEN_BITS_INTEGER_MARKER = 125
const SIXTEEN_BITS_INTEGER_MARKER = 126
const SIXTYFOUR_BITS_INTEGER_MARKER = 127
127 is the maximum size we can work on a data frame. Think of it as a water cup. If we fill it with water until it cannot fit more, we need to find a bigger water cup. Our current water cup can store messages up to 8-bit. If you try handling something bigger this will tell us that we need a bigger jar.
With the concept explained, let's continue with our implementation.
Now, inside the onSocketReadable handler, we need to read the next byte so we can start interpreting the information it contains. We can easily do that with socket.read(1) which will consume one more byte from the data frame, from the position we're currently at (remember: we already consumed the first byte before, so this will give us the second one):
function onSocketReadable (socket) {
socket.read(1)
const [markerAndPayloadLength] = socket.read(1)
console.log({ markerAndPayloadLength })
}
If you run that right now, you'll see nothing on screen, because the client isn't sending any messages, but we are consuming the stream we just opened. However, let's assume the user is sending a message containing only an empty string, which means our payload length is 0. If we got that message with our current code, the result on the console would be something like this:
{ markerAndPayloadLength: 128 }
Wait! The spreadsheet says that consuming the second byte from the request would give us the mask indicator and payload length. What does this 128 mean here? 🤔
If we convert that to binary using (128).toString(2) we'll get 10000000, an 8-bit binary. If we compare that to the spreadsheet, we can see that the first bit is the mask indicator, and the next seven are the payload length (0, in this case)
Now it makes sense! JavaScript is not reading each bit of the byte. It's using the integer representation and 128 means a whole byte which indeed contains the mask indicator and payload length.
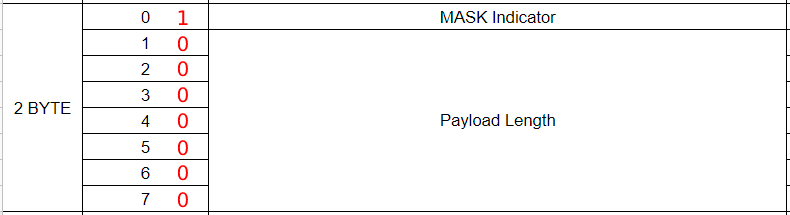
Now let's consider the example from the spreadsheet: we have the string "MDN" being sent instead of an empty string. The spreadsheet tells us that, in this case, the second byte is 131.

Converting that to binary gives us 10000101. Let's compare that to what the spreadsheet says about the second byte:

So, the first byte is again the mask indicator, and the next seven bytes are the payload length. We can convert the payload length to decimals using parseInt('0000101', 2) which will give us 3, and that is the correct payload length for "MDN".
Now that we've seen that the mask indicator is 128, we can remove it from the byte and read the payload length correctly:
const FIRST_BIT = 128
function onSocketReadable (socket) {
socket.read(1)
const [markerAndPayloadLength] = socket.read(1)
const lengthIndicatorInBits = markerAndPayloadLength - FIRST_BIT
let messageLength = 0
}
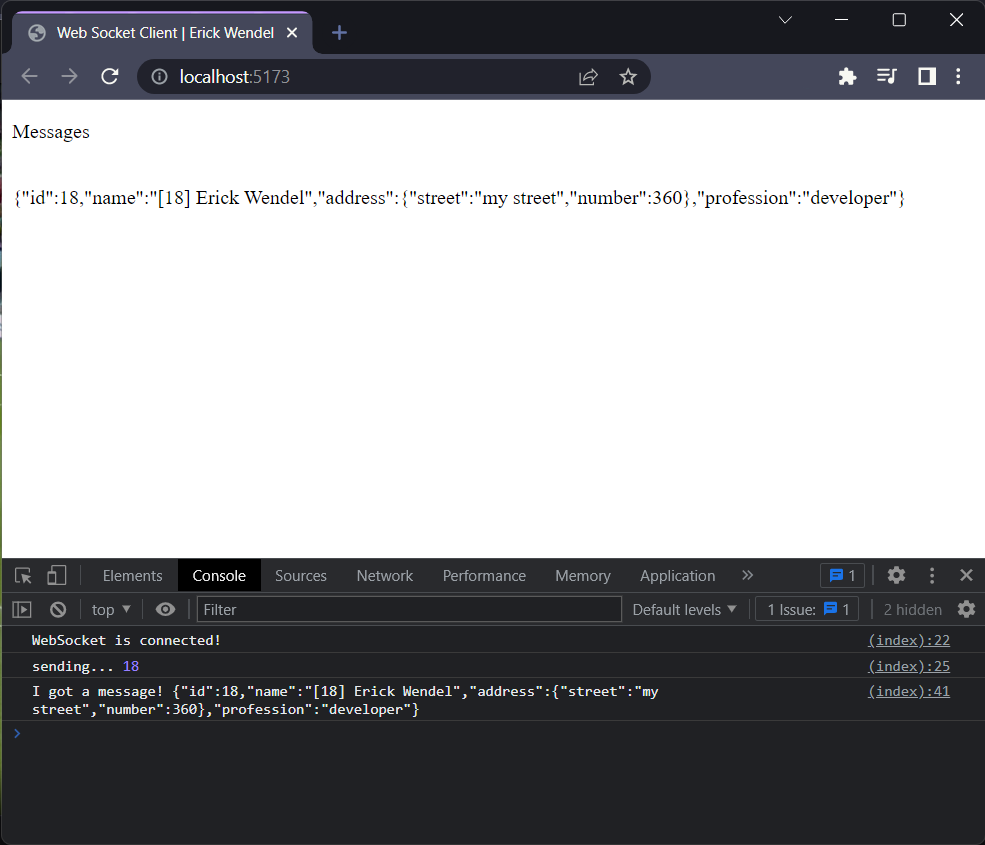
Now let's change the socket.onopen to see it in action. Go to index.html and call the socket.send function with some data to produce a somewhat small payload, like so:
socket.onopen = (event) => {
console.log('WebSocket is connected!')
const id = Math.round(Math.random() * 100)
console.log('sending...', id)
const data = JSON.stringify({
id,
name: `[${id}] Erick Wendel`,
address: {
street: 'my street',
number: 20 * id
},
profession: 'developer'
})
socket.send(data)
}
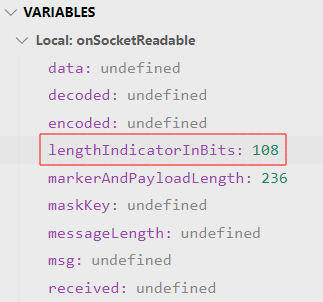
Don't worry about the content of that payload, we're just sending fake data so we can test things later. Now stop your server that was running with nodemon, go to server.mjs and add a breakpoint to the line where we define the messageLength variable, then hit F5 on VSCode (or start debugging with your preferred editor) and refresh the page.
When VSCode pops up, look at the value of the lengthIndicatorInBits in the Variables panel. If you used the same data as the snippet above, you should have a value close to 108 (give or take a few characters because the generated id can vary between 1 and 100). That tells us that this message is masked (because it comes from the client) and has a payload length of 7 bits because it's less than 125.
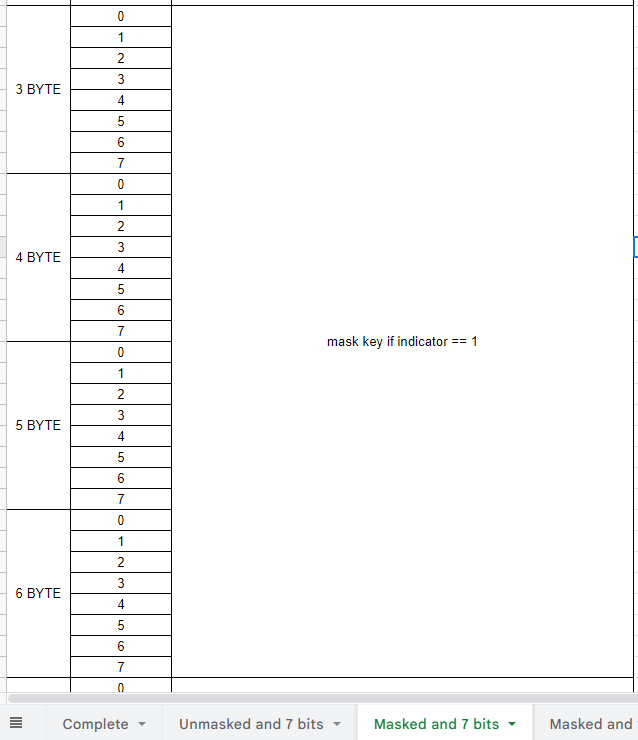
Now, go to the "Masked and 7 bits" tab of the spreadsheet and notice that, for this case, bytes 3 to 6 contain the mask key, which we need to decode the message.
Let's read that. First, we check if the payload length is 125 or less. For now, we'll throw an error if it isn't:
function onSocketReadable (socket) {
socket.read(1)
const [markerAndPayloadLength] = socket.read(1)
const lengthIndicatorInBits = markerAndPayloadLength - FIRST_BIT
let messageLength = 0
if (lengthIndicatorInBits <= SEVEN_BITS_INTEGER_MARKER) {
messageLength = lengthIndicatorInBits
} else {
throw new Error(
`your message is too long! we don't handle more than 125 characters in the payload`
)
}
}
Now we can read the mask, which will be 4 bytes in length, and the encoded payload, which is the remaining bytes from the message:
const MASK_KEY_BYTES_LENGTH = 4
function onSocketReadable (socket) {
socket.read(1)
const [markerAndPayloadLength] = socket.read(1)
const lengthIndicatorInBits = markerAndPayloadLength - FIRST_BIT
let messageLength = 0
if (lengthIndicatorInBits <= SEVEN_BITS_INTEGER_MARKER) {
messageLength = lengthIndicatorInBits
} else {
throw new Error(
`your message is too long! we don't handle more than 125 characters in the payload`
)
}
const maskKey = socket.read(MASK_KEY_BYTES_LENGTH)
const encoded = socket.read(messageLength)
}
If we tried to convert the value of the encoded variable to a string and console.log it right now, we'd get a bunch of gibberish, like so:

That's because the data is masked, and we need to unmask it before we can use it.
Unmasking the data
The MDN Article gives us the following snippet when talking about how to do this:
const DECODED = Uint8Array.from(ENCODED, (byte, i) => byte ^ MASK[i % 4]);
Let's break that down. First, let's look at the modulo operator, the % sign. It represents the rest of a division of one number by the other. In this case, since our mask always has 4 bytes, we use the modulo of whatever position in the message we are by the length of our mask to ensure we always get a valid position. This operation will always return 0, 1, 2 or 3, making sure we're accessing a valid position inside our mask.
Next, we have elt ^ mask. The ^ operator here is the XOR operator, it is part of a set of operators known as bitwise operators, a group of operators to perform math using the binary representation of numbers.
Last, we have Uint8Array.from(ENCODED, (elt, i) => ...). This function is creating a new byte array by iterating over the bytes of the ENCODED variable and, for each byte, calculates a new one by executing the XOR operator between that original byte and the key. It's kind of like a .map function, but for an array of bytes. Let's incorporate that into our code:
function onSocketReadable (socket) {
const decoded = unmask(encoded, maskKey)
}
function unmask (encodedBuffer, maskKey) {
const decoded = Uint8Array.from(encodedBuffer, (element, index) => element ^ maskKey[index % 4])
return Buffer.from(decoded)
}
Notice that we're doing the same thing, except we're converting the resulting byte array to a regular buffer before returning it. Now, if we use the debugger again to print the contents of the decoded variable using the toString method, we should get something like this:

Very nice! We're finally able to read some data! We can now add a simple JSON.parse with a console.log to print out the messages we receive.
const decoded = unmask(encoded, maskKey)
const received = decoded.toString('utf-8')
const data = JSON.parse(received)
console.log('message received!', data)
So, here is the full code up until now, which can receive and decode messages from clients:
import { createServer } from 'http'
import crypto from 'crypto'
const PORT = 1337
const WEBSOCKET_MAGIC_STRING_KEY = '258EAFA5-E914-47DA-95CA-C5AB0DC85B11'
const SEVEN_BITS_INTEGER_MARKER = 125
const SIXTEEN_BITS_INTEGER_MARKER = 126
const SIXTYFOUR_BITS_INTEGER_MARKER = 127
const FIRST_BIT = 128
const MASK_KEY_BYTES_LENGTH = 4
const server = createServer((request, response) => {
response.writeHead(200)
response.end('hey there')
})
.listen(PORT, () => console.log('Server listening on port', PORT))
function createSocketAccept (id) {
const hash = crypto.createHash('sha1')
hash.update(id + WEBSOCKET_MAGIC_STRING_KEY)
return hash.digest('base64')
}
function prepareHandshakeResponse (id) {
const acceptKey = createSocketAccept(id)
return [
'HTTP/1.1 101 Switching Protocols',
'Upgrade: websocket',
'Connection: Upgrade',
`sec-webSocket-accept: ${acceptKey}`,
''
].map(line => line.concat('\r\n')).join('')
}
function onSocketReadable (socket) {
socket.read(1)
const [markerAndPayloadLength] = socket.read(1)
const lengthIndicatorInBits = markerAndPayloadLength - FIRST_BIT
let messageLength = 0
if (lengthIndicatorInBits <= SEVEN_BITS_INTEGER_MARKER) {
messageLength = lengthIndicatorInBits
} else {
throw new Error(
`your message is too long! we don't handle more than 125 characters in the payload`
)
}
const maskKey = socket.read(MASK_KEY_BYTES_LENGTH)
const encoded = socket.read(messageLength)
const decoded = unmask(encoded, maskKey)
const received = decoded.toString('utf-8')
const data = JSON.parse(received)
console.log('message received!', data)
}
function unmask (encodedBuffer, maskKey) {
const decoded = Uint8Array.from(encodedBuffer, (element, index) => element ^ maskKey[index % 4])
return Buffer.from(decoded)
}
function onSocketUpgrade (req, socket, head) {
const { 'sec-websocket-key': webClientSocketKey } = req.headers
const response = prepareHandshakeResponse(webClientSocketKey)
socket.write(response)
socket.on('readable', () => onSocketReadable(socket))
}
server.on('upgrade', onSocketUpgrade)
;[
"uncaughtException",
"unhandledRejection"
].forEach(event =>
process.on(event, (err) => {
console.error(`something bad happened: ${event}, msg: ${err.stack || err}`)
})
)
A bit more on the XOR operator
Now that we have something working, let's take a step back to better understand what the XOR operator is doing. Let's do the following steps: we'll take a decimal number, parse that number into its binary representation, apply XOR on it, and get the character we want. I chose some numbers to help us understand that, in short, 71 and 53 were used because 71 in binary is 01000111 and 53 is 00110101 when we apply an XOR operation on both we get 01110010 which is the character "r". But let's go through it step by step.
First, we're going to convert those numbers to binary, making sure we always have them represented as 8 bits:
(71).toString(2).padStart(8, '0')
(53).toString(2).padStart(8, '0')
Notice that, now, we have kind of a table. What XOR does is that it compares each position from the first number to the same position in the second number. If both are equal, it returns 0, but if they're different, it returns 1. So, for the numbers we have above, we'll have something like this. We'll be using padStart to make sure that all the numbers have 8 characters, if they don't, we'll add 0 in front of it until it completes the size. This way we make sure they're all valid bytes:
(71).toString(2).padStart(8, '0')
(53).toString(2).padStart(8, '0')
If we convert that result to decimal by doing parseInt('01110010', 2), we'll get 114, which doesn't appear to mean much, until you put it through String.fromCharCode like so:
String.fromCharCode(parseInt('01110010', 2))
String.fromCharCode(71 ^ 53)
Let's add a bit of logging to our unmask function so we can see this happening in real-time:
function unmask (encodedBuffer, maskKey) {
const fillWithZeroes = (t) => t.padStart(8, '0')
const toBinary = (t) => fillWithZeroes(t.toString(2))
const fromBinaryToDecimal = (t) => parseInt(toBinary(t), 2)
const getCharFromBinary = (t) => String.fromCharCode(fromBinaryToDecimal(t))
const decoded = Uint8Array.from(encodedBuffer, (element, index) => {
const decodedElement = element ^ maskKey[index % 4]
console.log({
unmaskingCalc: `${toBinary(element)} ^ ${toBinary(maskKey[index % 4])} = ${toBinary(decodedElement)}`,
decoded: getCharFromBinary(decodedElement)
})
return decodedElement
})
return Buffer.from(decoded)
}
And now, if we stop our server, start debugging again, and refresh the page, we'll get something like this:
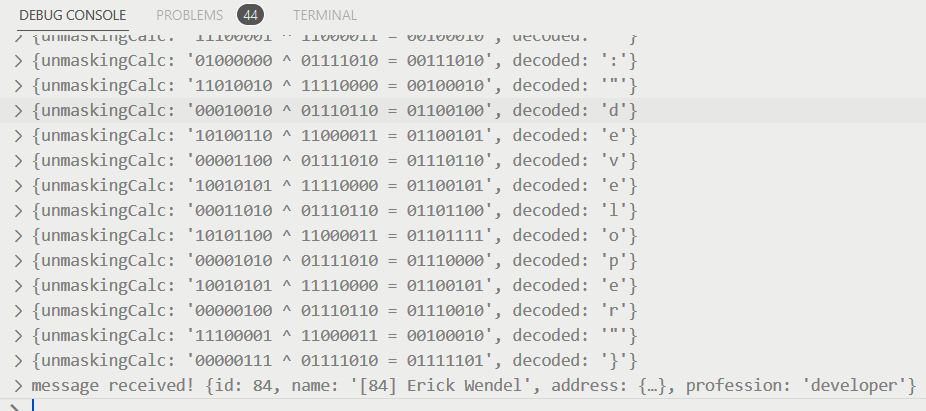
How nice is that? We can see the whole message there. Notice the "profession" field with the "developer" value! 😄
Sending messages back
If we use socket.read to get data from the client, it makes sense to use socket.write to send data back, right? Well, yes. But, for the browser to understand what we're sending, our server must also follow the specification and add our payload to a message fragment, although we don't need to mask the data we send back to the client. We can check the "Unmasked and 7 bits" tab in the spreadsheet to remember what that looks like:
Now let's add a new function and call it on the onSocketReadable function:
function onSocketReadable (socket) {
sendMessage(received, socket)
}
function sendMessage (msg, socket) {
socket.write(msg)
}
Okay, we're writing stuff, but we're not yet encapsulating the message on a frame, which is needed for the browser to be able to read it. To start preparing the message, we first need to know its size. We can do that by converting it to a Buffer and reading the length property
function sendMessage (msg, socket) {
const dataFrameBuffer = prepareMessage(msg)
socket.write(dataFrameBuffer)
}
function prepareMessage (message) {
const msg = Buffer.from(message)
const messageSize = msg.length
}
Now we need to add the first byte of the message. A byte is composed of 8 bits which are 0 by default. In this case, each bit has a meaning that we can check in the spreadsheet:

Our first bit for this byte is 1 because we have a single-frame message. If we set the first bit to 1, we get 10000000:
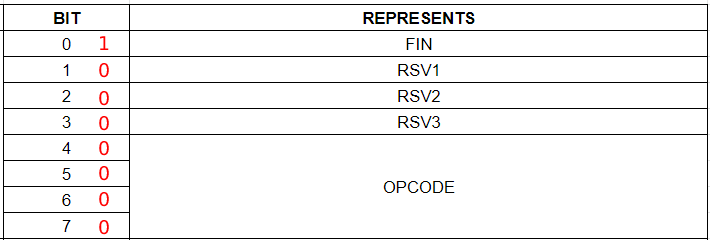
If we convert that to binary, we get 128.
Next, we add the OP CODE to indicate our payload is the text which, by the specification is 0x01 or just 1. So, to indicate that we have text in the payload, we set the last bit to 1, and the rest of the bit remains 0, like so:
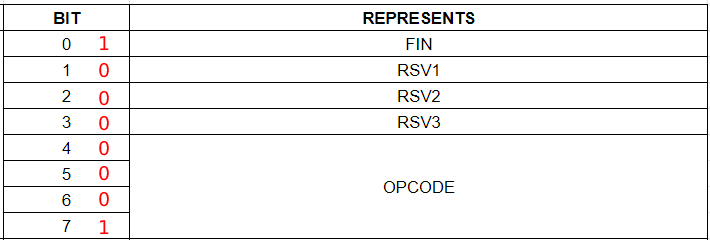
Now, let's do that in our code. First, we store 128 (which represents 10000000 in binary, as we've seen), and then we use the bitwise operator | to take 10000000 (128) and set the last bit to 1:
const FIRST_BIT = 128
const MASK_KEY_BYTES_LENGTH = 4
const OPCODE_TEXT = 0x01
function prepareMessage (message) {
const msg = Buffer.from(message)
const messageSize = msg.length
let dataFrameBuffer
const firstByte = 0x80 | OPCODE_TEXT
}
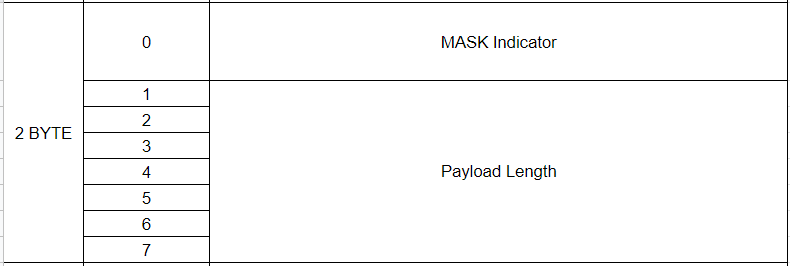
Now, we build the second byte, add it to an array, concatenate that array with the second byte and convert everything to a buffer. Since our message is not masked, the second byte must be the payload length, as shown in the spreadsheet:
function prepareMessage (message) {
const msg = Buffer.from(message)
const messageSize = msg.length
let dataFrameBuffer
const firstByte = 0x80 | OPCODE_TEXT
if (messageLength <= SEVEN_BITS_INTEGER_MARKER) {
const bytes = [firstByte]
dataFrameBuffer = Buffer.from(bytes.concat(messageSize))
} else {
throw new Error('message too long buddy :(')
}
}
The final step is to add the payload content into the buffer. You'll allocate a new buffer with a fixed size which is the message and the current data frame containing specific information defined on the WebSocket protocol, then you'll merge the current data frame with the message. For that, we can create a new function and use Buffer.allocUnsafe to create a new buffer that is the size of our full message, and then add each piece of information to that new buffer, like so:
function concat (bufferList, totalLength) {
  const target = Buffer.allocUnsafe(totalLength)
  let offset = 0

  for (const buffer of bufferList) {
    target.set(buffer, offset)
    offset += buffer.length
  }

  return target
}
Then we'll add the concat call the end of our function, right after we throw the error:
function prepareMessage (message) {
const msg = Buffer.from(message)
const messageSize = msg.length
let dataFrameBuffer
const firstByte = 0x80 | OPCODE_TEXT
if (messageLength <= SEVEN_BITS_INTEGER_MARKER) {
const bytes = [firstByte]
dataFrameBuffer = Buffer.from(bytes.concat(messageSize))
} else {
throw new Error('message too long buddy :(')
}
const totalLength = dataFrameBuffer.byteLength + messageSize
return concat([ dataFrameBuffer, msg ], totalLength)
}
And now if you run the server and refresh the browser, you should see the message on the screen!
That's very nice! But, now, we need to handle bigger messages because we only handle messages with 125 bytes. Using the supporting spreadsheet, we can check each tab to see what our frame should contain for each message size, so let's change our code to handle that.
The first thing we need to do is change our receiving code. If we take a look at the tab for the next message size, Masked, and 16 bits, we can see that the third and fourth bytes should contain our payload length now.
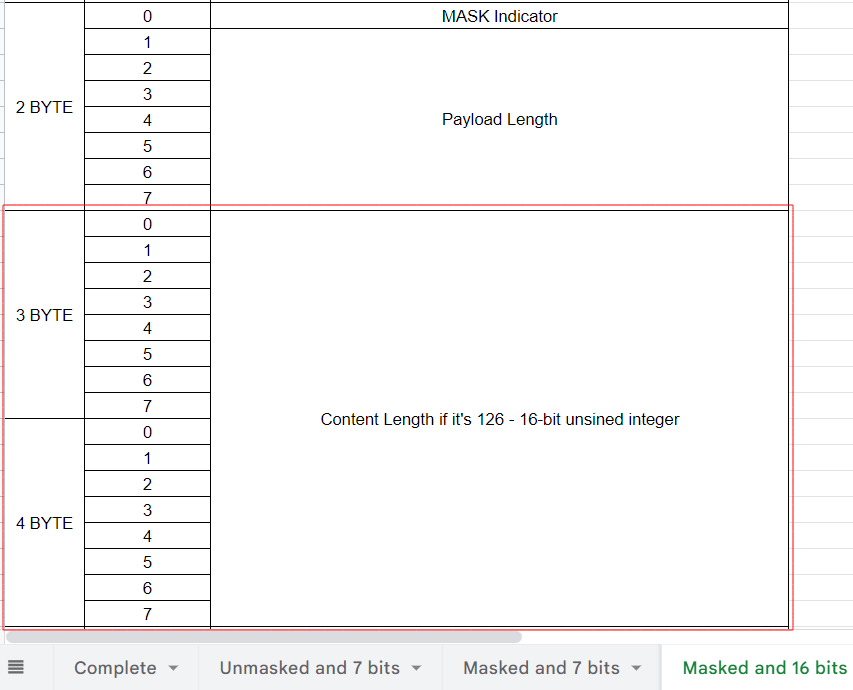
Let's see how that looks in the code.
Go back to the onSocketReadable function and add another case for the lengthIndicatorInBits condition we have and, inside that, change the message length to equal the two next bytes, interpreted as an unsigned, big-endian 16-bit integer:
function onSocketReadable() {
if (lengthIndicatorInBits <= SEVEN_BITS_INTEGER_MARKER) {
messageLength = lengthIndicatorInBits
}
else if (lengthIndicatorInBits === SIXTEEN_BITS_INTEGER_MARKER) {
messageLength = socket.read(2).readUint16BE(0)
}
else {
throw new Error(
`your message is too long! we don't handle more than 125 characters in the payload`
)
}
}
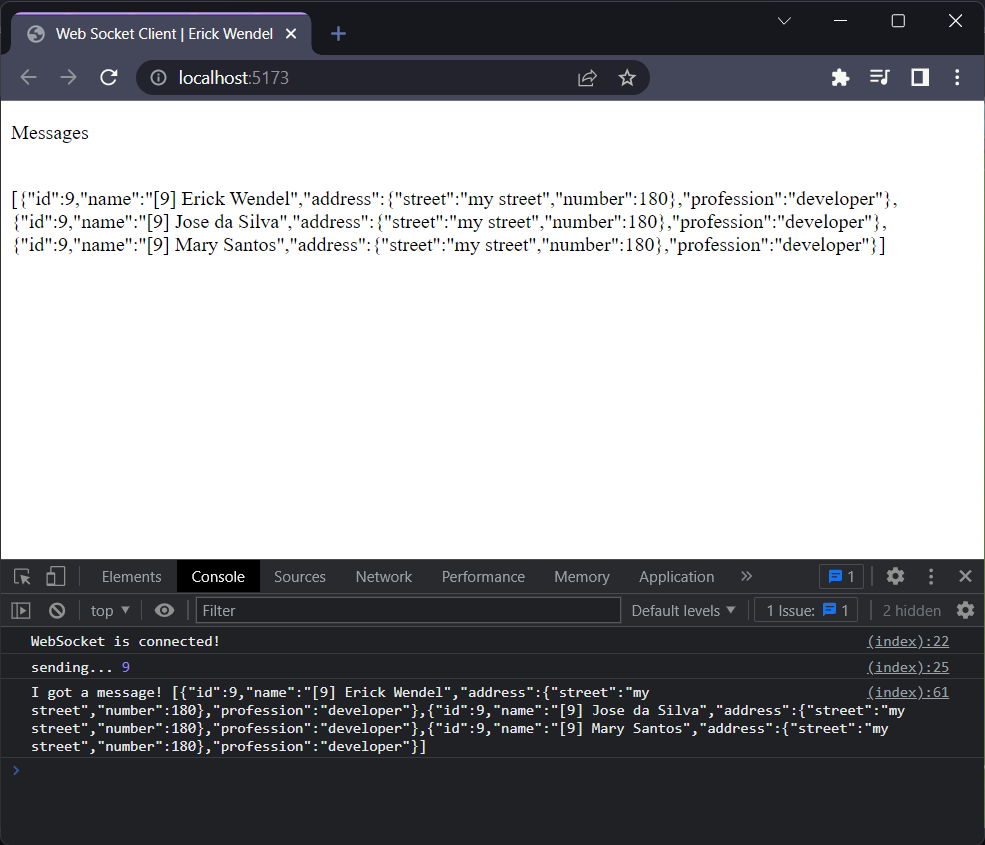
Notice that even though we're consuming bigger messages we don't need to change the whole structure. The socket.read function will always consume the remaining data after the message length. Now, let's try increasing the payload we send from index.html to see if our server can handle it:
socket.onopen = (event) => {
console.log('WebSocket is connected!')
const id = Math.round(Math.random() * 100)
console.log('sending...', id)
const data = JSON.stringify([
{
id,
name: `[${id}] Erick Wendel`,
address: {
street: 'my street',
number: 20 * id
},
profession: 'developer'
},
{
id,
name: `[${id}] Jose da Silva`,
address: {
street: 'my street',
number: 20 * id
},
profession: 'developer'
},
{
id,
name: `[${id}] Mary Santos`,
address: {
street: 'my street',
number: 20 * id
},
profession: 'developer'
}
])
socket.send(data)
}
Nice! Now, we can receive bigger messages!

We still can't send them, though. Let's fix that. To send bigger messages, we're going to use an offset in the prepareMessage function. We start by adding yet another condition. This time, we'll check if we reached the limit for 16-bit integer values. We'll use a constant for that:
const MAXIMUM_SIXTEEN_BITS_INTEGER = 2 ** 16
function prepareMessage (message) {
if (messageSize <= SEVEN_BITS_INTEGER_MARKER) {
const bytes = [firstByte]
dataFrameBuffer = Buffer.from(bytes.concat(messageSize))
}
else if (message <= MAXIMUM_SIXTEEN_BITS_INTEGER) {
}
else {
throw new Error('message too long buddy :(')
}
}
Now, we need to use the next two bytes in the buffer to set the payload size, meaning we already used the first 4 bytes: the first one with the FIN and OPCODE, the second one with the marker for 16-bit sized message, and the next two ones for the payload length:
We will start with a 4 bytes buffer and build our frame adding the first byte followed by the payload length indicator and an optional mask indicator, all this is followed by the 2 bytes from the 16-bit number which makes our payload length:
else if (message <= MAXIMUM_SIXTEEN_BITS_INTEGER) {
const offsetFourBytes = 4
const target = Buffer.allocUnsafe(offsetFourBytes)
target[0] = firstByte
target[1] = SIXTEEN_BITS_INTEGER_MARKER | 0x00
target.writeUint16BE(messageSize, 2)
dataFrameBuffer = target
}
So, to break it down, here's what we'll have in our data frame:
[0] - 128 (10000000) + 1 (00000001), which equals 10000001 in binary, which represents the FIN with a value of 1 and OPCODE also with a value of 1
[1] - 126 + 0, which is the payload length marker + the mask indicator
[2] - content length
[3] - content length
[4...] - the message itself
The last byte, which is the message itself, is already being added by the concat function at the end of the process, so we don't have to worry about it, which means we are done!
Now, if we run the server and refresh the webpage, we should see the long message logged to the console and written on the screen! How nice is that?!
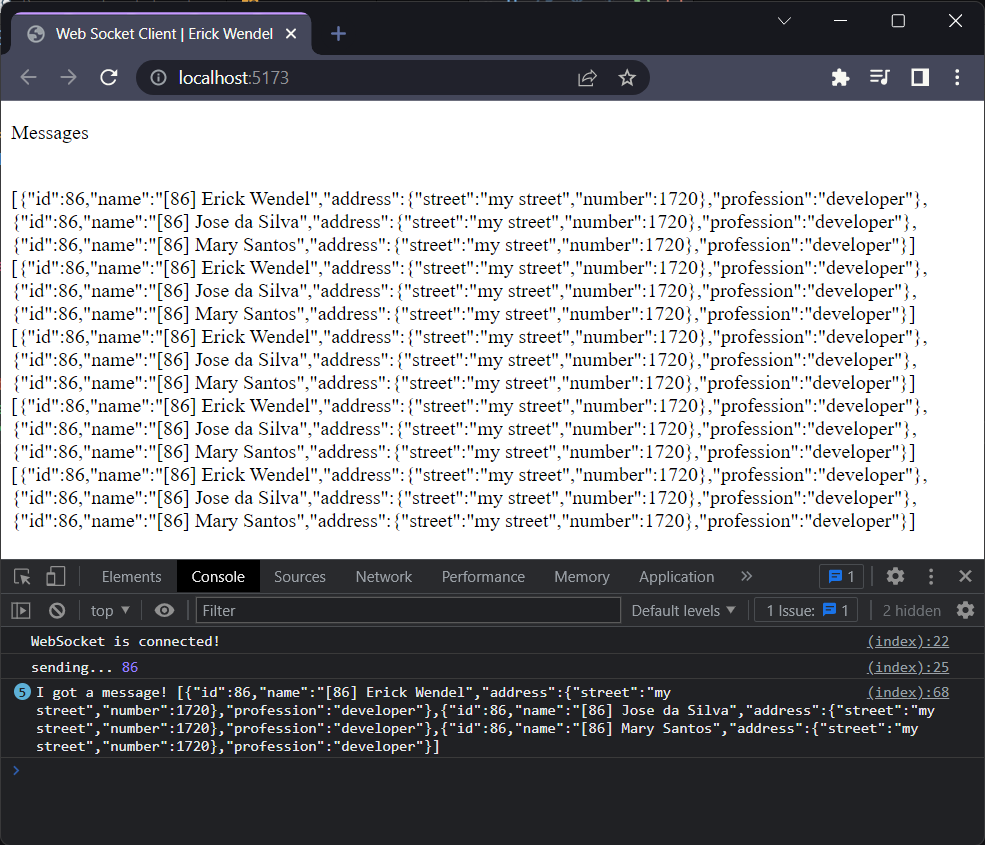
So, just to make it look nicer, we can make a few changes to our client, to send multiple messages and then close the connection:
socket.onopen = (event) => {
console.log('WebSocket is connected!')
const id = Math.round(Math.random() * 100)
console.log('sending...', id)
const intervalId = setInterval(() => {
const data = JSON.stringify(
[
{
id,
name: `[${id}] Erick Wendel`,
address: {
street: 'my street',
number: 20 * id
},
profession: 'developer'
},
{
id,
name: `[${id}] Jose da Silva`,
address: {
street: 'my street',
number: 20 * id
},
profession: 'developer'
},
{
id,
name: `[${id}] Mary Santos`,
address: {
street: 'my street',
number: 20 * id
},
profession: 'developer'
}
]
)
socket.send(data)
}, 1000)
setTimeout(() => {
clearInterval(intervalId)
}, 5000)
}
And the result is this:
And that's it! Congratulations on implementing a WebSocket server from scratch with no libraries! I hope you were able to follow all the examples, and that this article gave you some idea on how to handle binary data in Node.js.
If you want to go further, I suggest you try to implement messages with a 64-bit length, the ping and pong parts of the specification, and sending and receiving message frames as fragments. In our example, we only consume data from complete messages, but the WebSocket specification can handle messages split into multiple parts.
You can also try to implement authentication and routes in case you want to create webchats, or even implement the error handling for disconnected users in both back and front-end apps and check how your application is handling a bunch of users.
Conclusion
Wow, what a journey! Dealing with things bit by bit, as we've done here, is no easy challenge, but I hope you learned a lot from this, just as I did! Keep practicing and diving deeper, and your knowledge should keep growing. Don't forget that you can also check this content in video format and that the code for this tutorial is available on GitHub.