How to create E2E tests in Node.js with no frameworks - step by step!

Erick Wendel is an active Node.js core committer, Keynote Speaker, and professional educator.
He has given over 100 tech talks in more than 10 different countries worldwide.
He was awarded as a Node.js Specialist with the Google Developer Expert, Microsoft MVP, and GitHub Stars awards. Erick Wendel has trained more than 100K people around the world in his own company https://erickwendel.com
Intro
Heello my friend, how've you been? I'm Erick Wendel, and I'm here to bring you some great news!
The native testing engine of Node.js has finally reached the stage of stable functionality, and in this version, it already comes with a fancy reporter in the terminal.
In this post, I'll teach you how to perform end-to-end tests on a JavaScript-based Web API without the need for any framework or library.
You'll be able to use the new features to monitor code changes, the new --watch flag, and of course, get to know in-depth how amazing the Node.js test runner is.
Attention! Before we dive into this mind-blowing post, make sure you hit that thumbs-up button and join my Telegram channel. There I'll keep you posted about all the new content I've been releasing.
Are you ready? Grab a drink and let's begin!
TLDR;
You can find the source code on GitHub by clicking here. Don't forget to leave your star in the project. This helps me a lot with the work I've been doing here.
E2E Testing
E2E tests help you to test your application as if you didn't know about its implementation. It's meant to test all paths exposed by your application.
If you're exposing a Web Server, an E2E test would be an HTTP request. So you'd request your public routes from an HTTP Client and make assertions on the HTTP response.
Let's suppose you have an HTTP route for logging in users. It'd receive a username and password on the HTTP Request Body and respond with a token or a server error.
The Node.js Test Runner is now stable
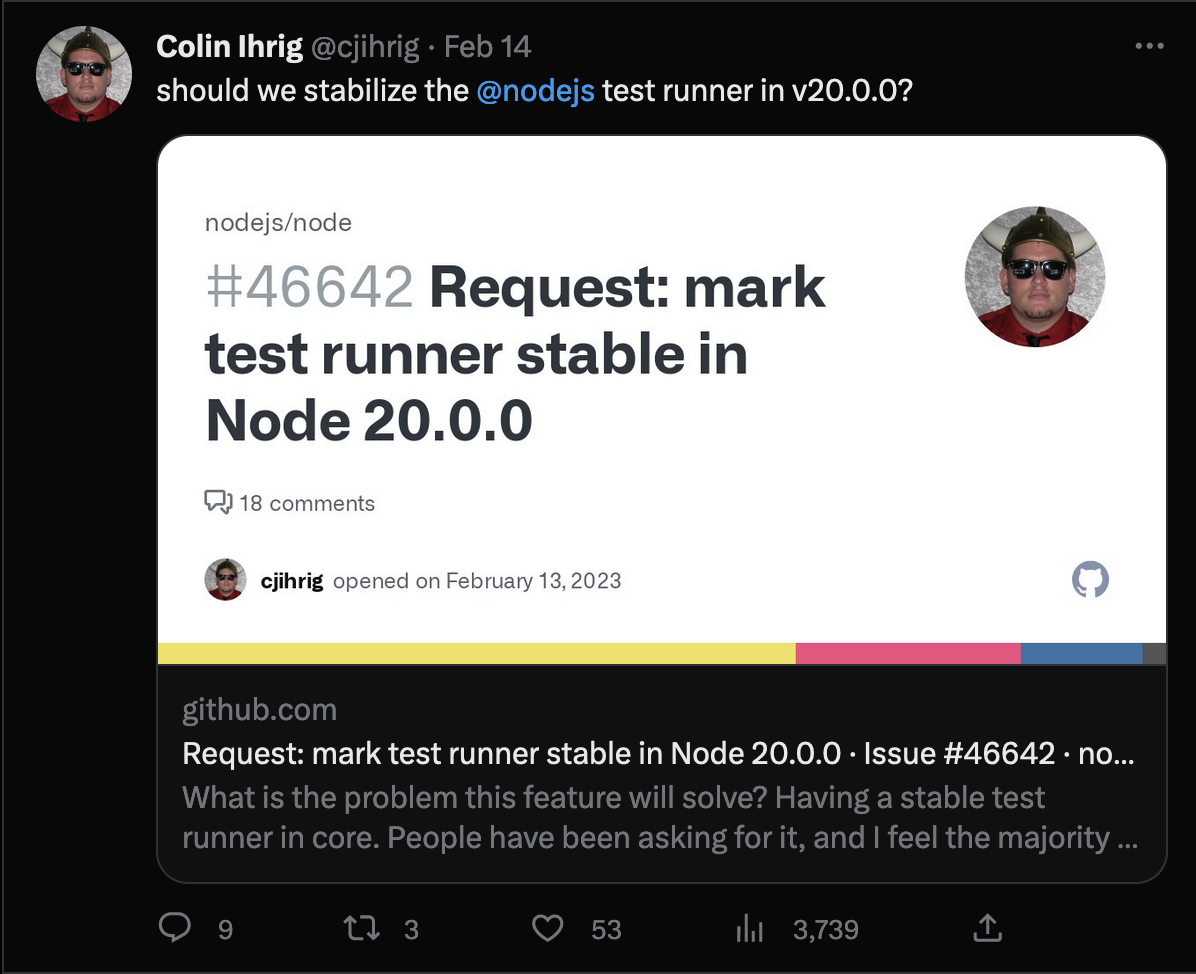
Colin Ihrig when submitting a request to mark the test runner as stable in the Node.js 20
The Node.js v19.9.0 came with a lot of new features and now you can use the newest features for the Node.js test runner such as test runner code coverage, default console reporter, custom reporters, mocking improvements, and more.
Although the test runner is not yet in the Node.js Long Term Support (LTS) version, you can try out installing the v19 (eg installing with nvm) to check all the amazing features.
You won't need to use Jest, Mocha, or similar to use describe, before, after, it, etc features.
They're all available in this native module.
// index.test.js
const { describe, before, after, it } = require('node:test')
describe('API Workflow', () => {
  it.todo('should receive not authorized given wrong user and password')
  it.todo('should login successfuly given user and password')
  it.todo('should not be allowed to access private routes without a token')
  it.todo('should be allowed to access private data with a valid token')
})
The output is beautiful with the new default reporter. If you name the file containing the code above as index.test.js and run node --test index.test.js you'd see the output below:
▶ API Workflow
  ✔ should receive not authorized given wrong user and password (0.250584ms)
  ✔ should login successfuly given user and password (0.050042ms)
  ✔ should not be allowed to access private data without a token (0.035792ms)
  ✔ should be allowed to access private data with a valid token (0.040208ms)
▶ API Workflow (1.625875ms)

ℹ tests 4
ℹ suites 1
ℹ pass 0
ℹ fail 0
ℹ cancelled 0
ℹ skipped 0
ℹ todo 4
ℹ duration_ms 8.161958
Getting started
In this tutorial, you're gonna create an app that makes user authentication and can access private routes and test each individual route using the native Node.js test runner.
You're gonna have an endpoint to authenticate users using username and password and then private routes that before allowing the user to access it, it's gonna check the user's token and either let the request pass through or reject it.
You MUST use Node.js v19 as the features shown in this post only works on this version or superior versions. I strongly recommend you install nvm to manage Node.js versions and get benefited from all new and experimental Node.js features.
Initializing the project
First, you'll need to use an empty folder. If you're in a Linux environment, run mkdir app (or manually create an empty folder) then run npm init -y to initialize the project.
You should see an output below:
Wrote to /Users/erickwendel/Downloads/projetos/how-to-e2e-testing-nodejs/app/package.json:

{
  "name": "app",
  "version": "0.0.1",
  "description": "",
  "main": "index.js",
  "scripts": {
    "test": "echo \"Error: no test specified\" && exit 1"
  },
  "keywords": [],
  "author": "",
  "license": "ISC"
}
You're gonna use the ECMAScript modules so you'll need to change the generated package.json file.
I'll create two files. api.js for the Web Server and api.test.js for testing the Web Server.
touch api.js api.test.js
You'd also include a few scripts in the package.json file to run the project and test it using the native test runner:
Using ECMAScript Modules:
Change the generated
package.jsonfile by adding"type":"module",right after theversionkey.Add testing scripts:
In the dev script, I'll add the --watch flag which will make our code reload given any change. I'll do it for both dev and test:dev scripts. For the test script, will only keep the --test flag so the process will exit right after the process has finished executing.
   "scripts": {
     "dev": "node --watch api.js",
     "test:dev": "node --test --watch api.test.js",
     "test": "node --test api.test.js"
    }
Your package.json now should look like the below:
 {
   "name": "app",
   "version": "0.0.1",
   "type": "module",
   "description": "",
   "main": "index.js",
   "scripts": {
     "dev": "node --watch api.js",
     "test:dev": "node --test --watch api.test.js",
     "test": "node --test api.test.js"
   },
   "keywords": [],
   "author": "erickwendel",
   "license": "ISC"
 }
Creating the Web Server
To create the Web Server, I've prepared the full application code so you'd focus only on the testing part.
You'll need to install the jsonwebtoken package to generate the authentication token after the user successfully login.
Run the command below to install it:
npm i jsonwebtoken@9.0.0
Then copy the code below and paste it into your api.js file. This code will create a Node.js Web Server using only the native Node.js HTTP module.
import { once } from 'node:events'
import { createServer } from 'node:http'
import JWT from 'jsonwebtoken'

const DEFAULT_USER = {
  user: 'erickwendel',
  password: '123'
}
const JWT_KEY = 'abc123'
async function loginRoute(request, response) {
  const { user, password } = JSON.parse(await once(request, 'data'))
  if (user !== DEFAULT_USER.user || password !== DEFAULT_USER.password) {
    response.writeHead(401)
    response.end(JSON.stringify({ error: 'invalid username!' }))
    return
  }
  const token = JWT.sign({ user, message: 'hey duuude!' }, JWT_KEY)

  response.end(JSON.stringify({ token }))
}
function isHeadersValid(headers) {
  try {
    const auth = headers.authorization.replace(/bearer\s/ig, '')
    JWT.verify(auth, JWT_KEY)

    return true
  } catch (error) {
    return false
  }
}

async function handler(request, response) {
  if (request.url === '/login' && request.method === 'POST') {
    return loginRoute(request, response)
  }
  if (!isHeadersValid(request.headers)) {
    response.writeHead(400)
    return response.end(JSON.stringify({ error: 'invalid token!' }))
  }
  response.end(JSON.stringify({ result: 'Hey welcome!' }))
}

const app = createServer(handler)
  .listen(3000, () => console.log('listening at 3000'))

export { app }
This code has two routes. The /login route will authenticate users and have a single user ready to be authenticated. You'd use it as a username erickwendel and as a password 123
The goal here is once the user successfully authenticates on the login route your application will return a token so users will have to use it in every single request passing it on the request's headers.
Should the token be valid, when you request the / route the server will respond with the JSON result { "result": "Hey Welcome" }.
Setting up the testing environment
You'll notice that in the api.js file's last line, there's a export { app } line. This will be the piece of cake for us testing our API as an external user would do it.
Copy the code below and paste it on your api.test.js file:
// api.test.js
import { describe, before, after, it } from 'node:test'
import { deepStrictEqual, ok, strictEqual } from 'node:assert'
const BASE_URL = 'http://localhost:3000'
describe('API Workflow', () => {
  let _server = {}
  let _globalToken = ''
  before(async () => {
    _server = (await import('./api.js')).app
    await new Promise(resolve => _server.once('listening', resolve))
  })
  after(done => _server.close(done))
})
This code snippet will startup the Web Server and once it's ready to receive requests it'll let the testing cases run. After you it runs all the tests the server will be closed.
It'll help when you use the Node.js watch mode and prevent the application to start a new Web Server instance before closing the actual one.
Now, run npm run test to see the output below:
❯ app (main) ✘ npm run test

> app@0.0.1 test
> node --test api.test.js

ℹ listening at 3000
✔ API Workflow (41.683375ms)
ℹ tests 1
ℹ pass 1
ℹ fail 0
ℹ cancelled 0
ℹ skipped 0
ℹ todo 0
ℹ duration_ms 93.657375
Writing tests for the /login route
Node.js thankfully got the fetch module thus will help you to request your web API without the need to install any additional libraries.
Usually, you'd install the supertest module but for our tutorial, only the Node.js native modules will be needed.
Run npm run test:dev so any change you do to your JavaScript files will result in Node.js restarting and re-executing your testing suite.
Now, the code below will create the first testing case:
import { describe, before, after, it } from 'node:test'
import { deepStrictEqual, ok, strictEqual } from 'node:assert'
const BASE_URL = 'http://localhost:3000'
describe('API Workflow', () => {
  let _server = {}
  let _globalToken = ''
  before(async () => {
    _server = (await import('./api.js')).app
    await new Promise(resolve => _server.once('listening', resolve))
  })
  after(done => _server.close(done))

  it('should receive not authorized given wrong user and password', async () => {
    const data = {
      user: 'erickwendel',
      password: ''
    }
    const request = await fetch(`${BASE_URL}/login`, {
      method: 'POST',
      body: JSON.stringify(data)
    })
    strictEqual(request.status, 401)
    const response = await request.json()
    deepStrictEqual(response, { error: 'invalid username!' })
  })

})
Notice that you'll be requesting the API as any Web Server consumer would do it. The fetch function will request the Web Server which is running on localhost:3000 on the login route.
Your terminal output should look like the below:
npm run test:dev

> app@0.0.1 test:dev
> node --test --watch api.test.js

ℹ listening at 3000
▶ API Workflow
  ✔ should receive not authorized given wrong user and password (42.944042ms)
▶ API Workflow (105.486666ms)
Now you got the idea, let's implement all tests for the login route:
import { describe, before, after, it } from 'node:test'
import { deepStrictEqual, ok, strictEqual } from 'node:assert'
const BASE_URL = 'http://localhost:3000'
describe('API Workflow', () => {
  let _server = {}
  let _globalToken = ''
  before(async () => {
    _server = (await import('./api.js')).app
    await new Promise(resolve => _server.once('listening', resolve))
  })
  after(done => _server.close(done))

  it('should receive not authorized given wrong user and password', async () => {
    const data = {
      user: 'erickwendel',
      password: ''
    }
    const request = await fetch(`${BASE_URL}/login`, {
      method: 'POST',
      body: JSON.stringify(data)
    })
    strictEqual(request.status, 401)
    const response = await request.json()
    deepStrictEqual(response, { error: 'invalid username!' })
  })
  it('should login successfuly given user and password', async () => {
    const data = {
      user: 'erickwendel',
      password: '123'
    }
    const request = await fetch(`${BASE_URL}/login`, {
      method: 'POST',
      body: JSON.stringify(data)
    })
    strictEqual(request.status, 200)
    const response = await request.json()
    ok(response.token, 'token should be present')
    _globalToken = response.token
  })
})
Notice that in this code, I'm keeping the token that was returned on the login route to reuse it while requesting other routes.
Brief Announcement
Just a quick break. I've released my first training course in English and it's been amazing! It's a complete course on JavaScript Streams.

As the only course on the market that covers JavaScript Streams in-depth, this training program is unlike anything you've ever seen before.
From the basics to advanced concepts, you'll explore every nook and cranny of this powerful tool, unlocking its full potential and discovering how it can change how you write JavaScript code.
With this course, the sky's the limit! Check this page for full info on the training.
Also, follow me on Instagram, Twitter, and LinkedIn, and check out my website where I gather all the training courses I've launched.
There's a lot of information that can help you, and of course, a lot of free content for you.
Let's keep going.
Writing tests for private routes
Now it's the fun part. You're gonna implement two different tests in which:
Requests the
/route with an invalid tokenRequests the
/route with a valid token
I like writing test cases that fail first so I get all potential flaws in my code before writing the "happy" paths.
Add the test cases below right after the login routes test cases:
    it('should not be allowed to access private data without a token',     async () => {

    const request = await fetch(`${BASE_URL}/`, {
      method: 'GET',
      headers: {
        authorization: ''
      }
    })

    strictEqual(request.status, 400)
    const response = await request.json()
    deepStrictEqual(response, { error: 'invalid token!' })
  })

  it('should be allowed to access private data with a valid token', async () => {

    const request = await fetch(`${BASE_URL}/`, {
      method: 'GET',
      headers: {
        authorization: _globalToken
      }
    })

    strictEqual(request.status, 200)
    const response = await request.json()
    deepStrictEqual(response, { result: 'Hey welcome!' })
  })
Your terminal should be as printed below:
npm run test:dev

> app@0.0.1 test:dev
> node --test --watch api.test.js

ℹ listening at 3000
▶ API Workflow
  ✔ should receive not authorized given wrong user and password (31.121709ms)
  ✔ should login successfuly given user and password (5.770042ms)
  ✔ should not be allowed to access private data without a token (2.354958ms)
  ✔ should be allowed to access private data with a valid token (2.866334ms)
▶ API Workflow (95.019417ms)
Just in case the code didn't work for you, here is the full code for the api.test.js file:
import { describe, before, after, it } from 'node:test'
import { deepStrictEqual, ok, strictEqual } from 'node:assert'
const BASE_URL = 'http://localhost:3000'
describe('API Workflow', () => {
  let _server = {}
  let _globalToken = ''
  before(async () => {
    _server = (await import('./api.js')).app
    await new Promise(resolve => _server.once('listening', resolve))
  })
  after(done => _server.close(done))

  it('should receive not authorized given wrong user and password', async () => {
    const data = {
      user: 'erickwendel',
      password: ''
    }
    const request = await fetch(`${BASE_URL}/login`, {
      method: 'POST',
      body: JSON.stringify(data)
    })
    strictEqual(request.status, 401)
    const response = await request.json()
    deepStrictEqual(response, { error: 'invalid username!' })
  })
  it('should login successfuly given user and password', async () => {
    const data = {
      user: 'erickwendel',
      password: '123'
    }
    const request = await fetch(`${BASE_URL}/login`, {
      method: 'POST',
      body: JSON.stringify(data)
    })
    strictEqual(request.status, 200)
    const response = await request.json()
    ok(response.token, 'token should be present')
    _globalToken = response.token
  })

  it('should not be allowed to access private data without a token', async () => {

    const request = await fetch(`${BASE_URL}/`, {
      method: 'GET',
      headers: {
        authorization: ''
      }
    })

    strictEqual(request.status, 400)
    const response = await request.json()
    deepStrictEqual(response, { error: 'invalid token!' })
  })

  it('should be allowed to access private data with a valid token', async () => {

    const request = await fetch(`${BASE_URL}/`, {
      method: 'GET',
      headers: {
        authorization: _globalToken
      }
    })

    strictEqual(request.status, 200)
    const response = await request.json()
    deepStrictEqual(response, { result: 'Hey welcome!' })
  })
})
Wrapping Up
You can use the Node.js test runner if you're using Node.js v19+. It's being great to see this module being built from the ground up.
Still, there's a lot to improve.
In case you wanna submit ideas or report bugs, go to the official Node.js repository and fill in an issue.
Thank you for reading. Let me know in the comments what you found out about this comment and please let your suggestion for what's next.
Follow me on my social media channels and take a look at my newest course on JavaScript Streams.
And if you want to see more content like this, keep an eye on the blog and of course, subscribe to my Youtube channel.
I hope this content has exceeded your expectations, I'm Erick Wendel, and 'till next post!