Intro
RxJS but Web Streams? What?
Yep! In this blog post, you will implement RxJS operators from scratch using vanilla JS and Web Streams.
You're gonna implement a project that lets you keep track of how you move your mouse while holding the mouse click using reactive programming.
I also did a full example that lets you draw using your mouse (or mobile touchscreen) using the same concepts I'll be showing you here.
You can find the GitHub repo here and play with the demo below.
This blog post is gonna help you understand how Web streams work in practice, the principles of reactive programming, and rethink how you've been writing your JavaScript applications.
If you wanna jump to the code examples you can find them here on my GitHub repo.
By the end of this post, you'll be able to understand advanced concepts about Web Streams and how to use Reactive Programming in your favor.
RxJS

RxJS is one of the most popular libraries worldwide and by the time I write this post, it has been downloaded over 44M times weekly.
Pretty impressive isn't it?
It became pretty popular when Microsoft and Google joined forces to build Angular and nowadays is one of the most popular Web frameworks in the world
It helps you to process complex asynchronous flows using concepts from Reactive Programming.
Using RxJS in Web Applications
Going to a webpage, you'd listen to web page events such as mouse clicks and printing the results on the terminal.
document.body.addEventListener('click', (e) => {
 const data = {x: clientX, y:  e.clientY}
 console.log(`you clicked here: X: ${data.x}, Y: ${data.y}`)
})
Doesn't matter how many clicks the user might click, this function will always react to it and print out results as expected.
Using RxJS to reach the same goal you'd end up with a similar code below.
import { fromEvent, map } from 'https://cdn.jsdelivr.net/npm/rxjs@7.8.1/+esm'
fromEvent(document.body, 'click')
    .pipe(
        map(e => ({ x: e.clientX, y: e.clientY }))
    )
    .subscribe(data =>
        console.log(`you clicked here: X: ${data.x}, Y: ${data.y}`)
    )
Notice that RxJS introduces an interesting concept of piping results from previous steps.
It enforces readability, and function composition and makes it easier to understand the application flow by looking to the main execution function.
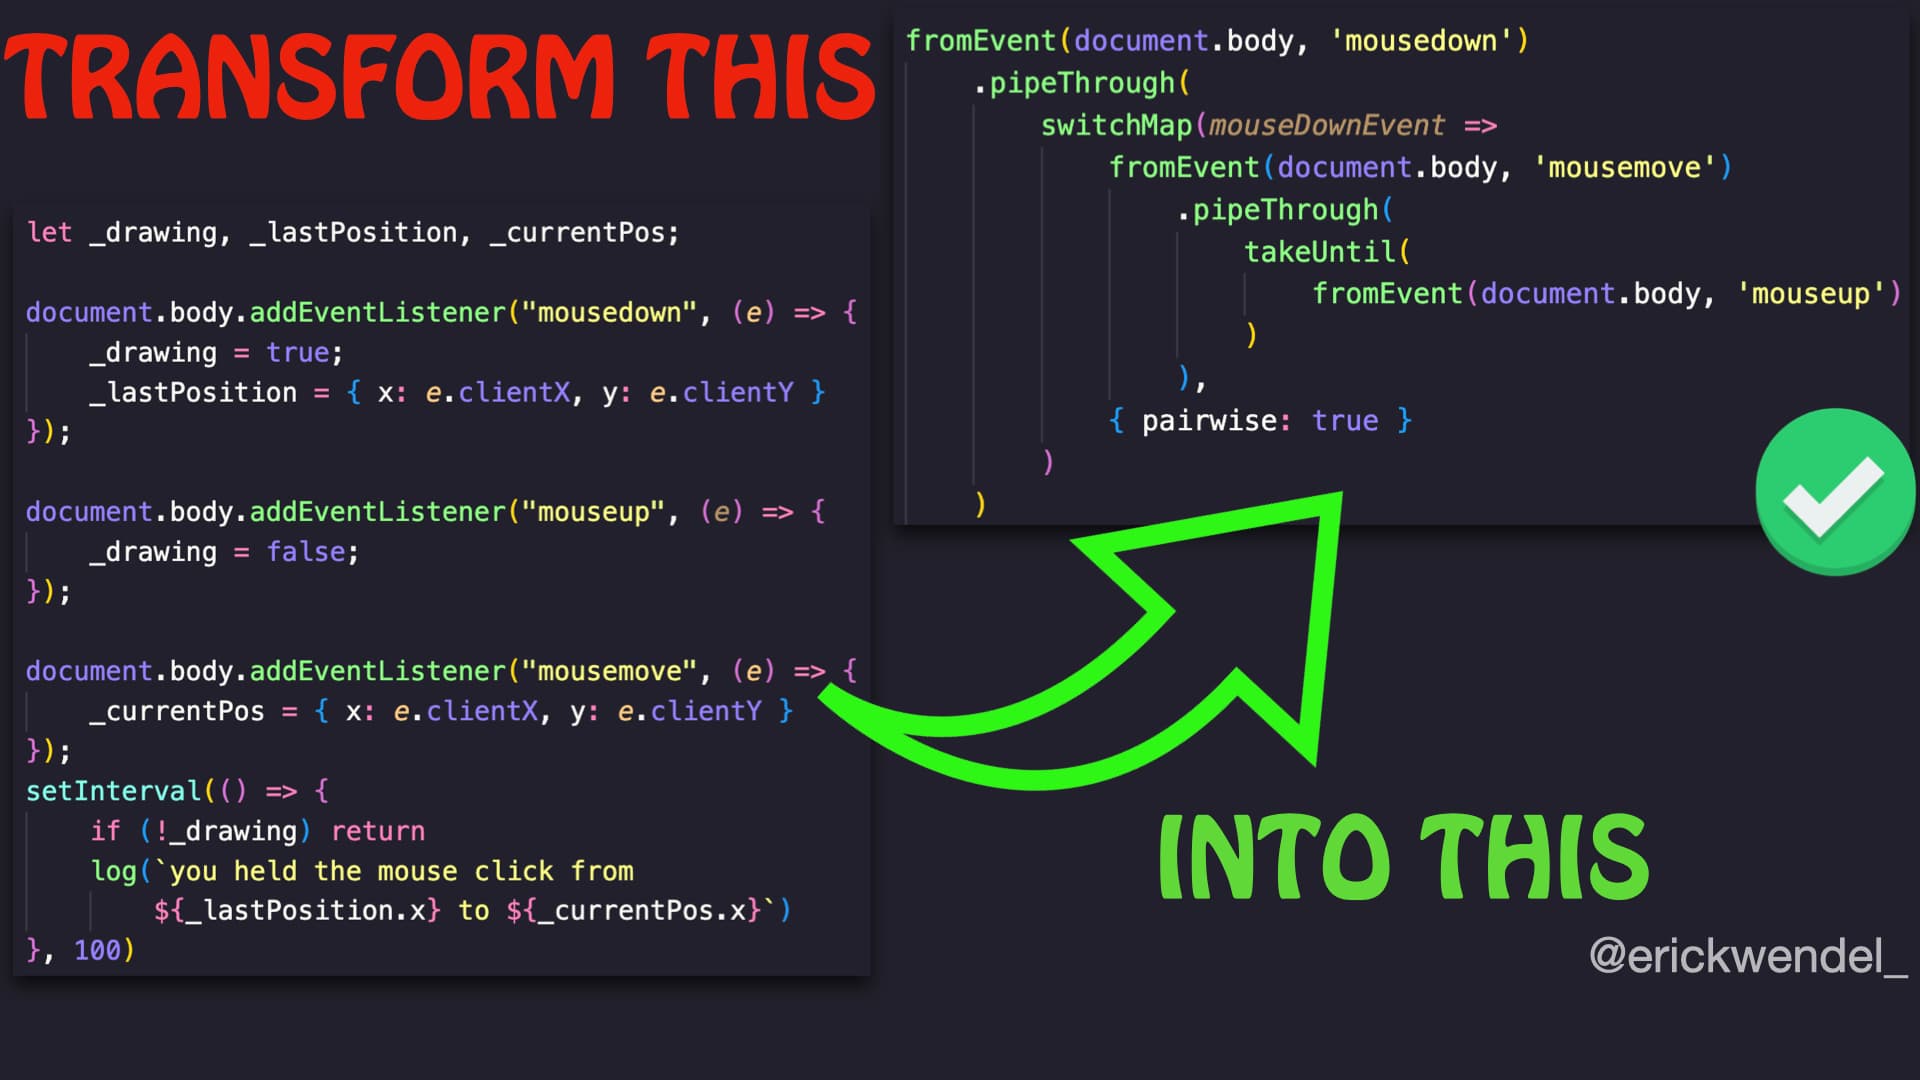
As applications grow you'd have to listen to different events and react to them which can easily lead to confusing code and a lot of bad practices as below.
let _drawing, _lastPosition, _currentPos;

document.body.addEventListener("mousedown", (e) => {
    _drawing = true;
    _lastPosition = { x: e.clientX, y: e.clientY }
});

document.body.addEventListener("mouseup", (e) => {
    _drawing = false;
});

document.body.addEventListener("mousemove", (e) => {
    _currentPos = { x: e.clientX, y: e.clientY }
});
setInterval(() => {
    if (!_drawing) return
    console.log(`you held the mouse click from ${_lastPosition.x} to ${_currentPos.x}`)
}, 100)
This code listens to mouse clicks and prints out the path you moved until you lose the click. It has several bad practices:
Using RxJS, you'd fluently write what is the order of the operations.
At first, could be tricky to understand what each function does without reading the docs but let's go through the logic I used here.
The main goal is to track the path a mouse has gone while holding the mouse click on the page.
First, you need to listen to the mouse click, then you need to start capturing when the mouse moves until you lose it, and then print the results.
Look at the code and I'll let you know in detail what it means.
import { fromEvent, map, switchMap, pairwise, takeUntil } from 'https://cdn.jsdelivr.net/npm/rxjs@7.8.1/+esm'
fromEvent(document.body, 'mousedown')
.pipe(
switchMap(() => {
return fromEvent(document.body, 'mousemove')
.pipe(
takeUntil(fromEvent(document.body, 'mouseup')),
pairwise()
)
})
)
.pipe(
map(([mouseDown, mouseMove]) => {
return { from: mouseDown.clientX, to: mouseMove.clientX }
})
)
.subscribe(e =>
console.log(`you held the mouse click from ${e.from} to ${e.to}`)
)
Breaking down the flow step by step it's gonna be:
start listening to the mouse click
change the pipeline focus to send the data from the mouse movement instead of the mouse click
Only track the movement until the mouse click is lose
make sure both the initial mouse click and the mouse move events are sent through the pipeline
map only the data you need and send it to the pipeline
print results
With this approach, you won't need any global state nor will need to put a setInterval to print out results as they change
You instead, print results in real-time with a fluent and more human way of thinking of reacting to events.
Web Streams
Web Streams or the Stream API is one of my favorite JavaScript features of all time.
You can use them to process gigabytes of data in JavaScript at ease as the goal is to process portions of data at a time.
In case you wanna deeply learn them I have premium content that shows real-world projects and examples of how to use both Node.js and Web Streams to empower the projects you've been involved check it out here
They're divided into three main concepts:
Readable Streams
Writable Streams
Transform Streams
A Readable Stream is usually the data source of a pipeline. Reading files, listening to events, downloading data sets, and much more.
A Writable Stream is a function used to output results. Writing data to files, printing out results, rendering, and more.
A Transform Stream works as the man in the middle.
You'd receive individual items from a Readable Stream, map them into a different format, filter, transform, and send them to a Writable stream to finish the process.
Looking at the code I wrote using RxJS reimaging them as Web Streams they'd be:
fromEvent - Listening to events - Readable Stream
switchMap - Changing the focus of the pipeline - Transform Stream
takeUntil - The "stop term" for the pipeline - Transform Stream
map - transforming data - Transform Stream
.subscribe - processing the results from the pipeline - Writable Stream
The wonderful thing about Web Streams is that they're part of the JavaScript Specification which means that they work in all places JavaScript is fully implemented so you don't need to install any third-party library.
Implementing RxJS operators from scratch
For this blog post, I'm gonna implement operators you've seen being used in the steps above and they're:
fromEvent - lets you listen to DOM events
switchMap - lets you switch the focus of the pipeline to a different event
takeUntil - lets you define when to stop listening to the current data source
interval - lets you execute setInterval as a stream
map - lets you iterate on each result and transform them as you wish
fromEvent
As data sources in Web Streams are Readable Streams, fromEvent is the data source, the starting point for the pipeline.
First, you are gonna need to instantiate the ReadableStream class and set up a few functions: start and cancel.
Using the start function you define how you're gonna start producing data and cancel will be used to clean up the event once the process ends.
The full code will look like below:
const fromEvent = (target, eventName) => {
let _listener
return new ReadableStream({
start(controller) {
_listener = (e) => controller.enqueue(e)
target.addEventListener(eventName, _listener)
},
cancel() {
target.removeEventListener(eventName, _listener)
}
})
}
fromEvent(document.body, 'mousedown')
.pipeTo(
new WritableStream({
write(data) {
console.log('mousedown', data.clientX, data.clientY)
}
})
)
Instead of using .pipe from RxJS, Web Streams use .pipeThrough and .pipeTo to let the data flow in the pipeline.
.pipeThrough sends data to a Transform Stream and .pipeTo to a Writable Stream.
Writable Streams are the way to print out results, the "final product", so you also need to create an instance from it to be able to see the final output on your terminal.
One more good thing here is that Web Streams have a good way to handle lifecycles and help you prevent memory leaks. Using the cancel function will make sure when you wanna stop the process no listeners will be active and will clean up memory for you.
Check out the working demo below:
switchMap and pairwise
Remember what is the logic of this app?
You'll listen to the mouse click and then will need to start listening to the mouse movement to output the full path the mouse has moved around.
To be able to track two different events, switch Map would be the most challenging operator to implement.
You need to listen to the initial event (mouse click) and after that start listening to the new pipeline target (mouse move)
Switch Map is the middle ground between the initial event and consuming the new target to yield data to the final process (printing out the results).
The middleware in Web Streams are Transform Streams and that's what you're gonna need to make this work.
A Transform Stream is both a Readable and a Transform Stream which means you can use the same start function used in the previous example and the transform function to handle whenever an item is returned from an event.
For example, once you pipe the events from the mouse click, the transform function will be triggered.
One tricky thing here is that you'll need to manually consume the new target (which for this example will be the mouse move). Once the mouse click is fired, start reading data from the mouse move and propagate it.
You're gonna notice that I implemented pairwise which in RxJS is a separate operator. Pairwise will make sure to propagate the previous target and the new target.
For you, that means that for each mouse movement, you'll also propagate the mouse click that started it.
For this demo, I found it best to just add it as a conditional property to send both results or just the results from the new target (mouse movement).
Take a look at the full code and I'll dive into it in a sec:
const switchMap = (fn, options = { pairwise: true }) => {
return new TransformStream({
transform(chunk, controller) {
const stream = fn.bind(fn)(chunk)
const reader = (stream.readable || stream).getReader()
async function read() {
const { value, done } = await reader.read()
if (done) return
const result = options.pairwise ? [chunk, value] : value
controller.enqueue(result)
return read()
}
return read()
}
})
}
fromEvent(document.body, 'mousedown')
.pipeThrough(
switchMap(mouseDownEvent =>
fromEvent(document.body, 'mousemove'),
{ pairwise: true }
)
)
.pipeTo(
new WritableStream({
write([mouseDown, mouseMove]) {
console.log(
`you moved your mouse from ${mouseDown.clientX} to ${mouseMove.clientX}`
)
}
})
)
Going through the logical order I defined in the code comments it's gonna follows:
Execute the callback passing through the item returned by the main pipeline (mouse click)
get the reference to start consuming the stream. If the target is a TransformStream the reader is gonna be a property called readable if it's a ReadableStream the reader is itself.
Call the read function recursively to consume all data returned by the stream
either return both values or just the new target data.
propagate the result returned by the new target (mouse move)
call the read function again to keep reading data from the mouse movement as they come.
Switch Map will switch the context to either a Readable Stream or a Transform Stream. The good thing is that you've already implemented fromEvent so you can just reuse it.
You can notice in the demo below that once you mouse click, the mouse move is being printed on the page.
takeUntil
You're gonna need a way to stop recording the mouse movement which is when you lose the click.
Implementing takeUntil will help you to listen to the first event and make all stream flow stop.
It can also work with the main data source, a Readable Stream, or be the middle ground as you'll be using here, a Transform Stream.
const takeUntil = (stream) => {
const readAndTerminate = async (stream, controller) => {
const reader = (stream.readable || stream).getReader()
const { value } = await reader.read()
controller.enqueue(value)
controller.terminate()
}
return new TransformStream({
start(controller) {
readAndTerminate(stream, controller)
},
transform(chunk, controller) {
controller.enqueue(chunk)
}
})
}
fromEvent(document.body, 'mousedown')
.pipeThrough(
switchMap(mouseDownEvent =>
fromEvent(document.body, 'mousemove')
.pipeThrough(
takeUntil(
fromEvent(document.body, 'mouseup')
)
),
{ pairwise: true }
)
)
.pipeTo(
new WritableStream({
write([mouseDown, mouseMove]) {
console.log(
`you moved your mouse from ${mouseDown.clientX} to ${mouseMove.clientX}`
)
}
})
)
And the working example:
Notice an interesting thing. For takeUntil, I used both start and transform functions.
The transform function will keep the flow going, any data going in the pipeline will pass through and you ain't gonna interfere with that.
With the start function, you start listening to the stream and once it's triggered it's gonna stop all data flow. In other words, once you lose the mouse click, it should stop printing out results.
In the start function, I didn't use the return keyword to execute the readAndTerminate function on purpose.
As the start function is triggered when you instantiate the Readable Stream if you return a promise, it's gonna wait for it to finish and block all the processing.
I simply schedule a silent asynchronous operation and when it ends it passes through the remaining data and terminates the process.
Also, notice that the takeUntil is being piped to the mousemove event which creates a sub-routine inside it.
This means that the mouse move event and the mouse up are linked.
Once you lose the mouse click, it's gonna stop listening to the mouse move and subsequently stop sending data to the final .pipeTo function.
map
The map operator is the easy one. It's gonna be used to map and interact with each returned item from the pipeline.
const map = (fn) => {
return new TransformStream({
transform(chunk, controller) {
controller.enqueue(fn.bind(fn)(chunk))
}
})
}
fromEvent(document.body, 'mousedown')
.pipeThrough(
switchMap(mouseDownEvent =>
fromEvent(document.body, 'mousemove')
.pipeThrough(
takeUntil(
fromEvent(document.body, 'mouseup')
)
),
{ pairwise: true }
)
)
.pipeThrough(
map(([mouseDown, mouseMove]) => {
return {
from: mouseDown.clientX,
to: mouseMove.clientX
}
})
)
.pipeTo(
new WritableStream({
write({ from, to}) {
console.log(
`you moved your mouse from ${from} to ${to}`
)
}
})
)
Following the single responsibility principle, the map operator is gonna be used to transform results before sending them to the final result.
See the results
interval
Going beyond you can try implementing other operators from RxJS to generate data. Implementing interval means that you'll need to wrap the setInterval from the browser and make sure that when it's asked to stop producing data, properly stop the interval.
const interval = (ms) => {
let _intervalId
return new ReadableStream({
start(controller) {
_intervalId = setInterval(() => {
controller.enqueue(Date.now())
}, ms)
},
cancel() {
clearInterval(_intervalId)
}
})
}
At this point, you can play with the operators you've made by combining them.
In the example below, you set an interval to run every 1/4 of a second, let it run until a click is fired, and print out the results of the counter.
interval(200)
    .pipeThrough(
        takeUntil(
            fromEvent(document.body, 'click')
        )
    )
    .pipeThrough(
        map(function (time) {
            this.counter = this.counter ?? 0
            return ++this.counter
        })
    )
    .pipeTo(
        new WritableStream({
            write(counter) {
                console.log(counter)
            }
        })
    )
Wrapping Up
RxJS and Reactive programming is pretty fun and powerful.
It demands you to think differently and compose complex workflows with an approach that lets you control and see what going on in your applications
Using Web Streams, lets you process large amounts of data (such as gigabytes of data) in any environment JavaScript is fully implemented.
Let me know in the comments what you thought about this experiment and I invite you to implement another RxJS operator using Web Streams and post it here in the comments section how the experience
Check out the full source code and if you wanna go deeper about using JavaScript Streams in the real world give it a shot.
I'm on all over social media channels as Erick Wendel, follow me on Twitter, check out my YouTube channel, and let me know in the comments what should I bring next to this blog.
Thanks for reading, until next time!
References
https://github.com/ErickWendel/rxjs-operators-clone
https://www.nodejsstreams.com/
https://www.learnrxjs.io/learn-rxjs/operators/creation/fromevent
https://www.learnrxjs.io/learn-rxjs/operators/transformation/switchmap
https://www.learnrxjs.io/learn-rxjs/operators/combination/pairwise
https://www.learnrxjs.io/learn-rxjs/operators/filtering/takeuntil
https://www.learnrxjs.io/learn-rxjs/operators/transformation/map
https://www.learnrxjs.io/learn-rxjs/operators/creation/interval
https://codepen.io/yguo/pen/OyYGxQ
https://medium.com/@tarik.nzl/creating-a-canvas-component-with-free-hand-drawing-with-rxjs-and-angular-61279f577415